
Introduction to Building a Low-Cost Home Server
In the digital age, having your own personal server at home is no longer a luxury; it’s a necessity. Whether you’re looking to streamline your media, secure your data, or experiment with network projects, a home server is the ultimate cornerstone for any tech enthusiast. This guide will walk you through constructing an energy-efficient server for under $300, making it both practical and affordable.
The primary goal of building a low-cost home server is to balance affordability with performance. Selecting the right components for your budget server build is critical in achieving a perfect blend of cost-effectiveness and efficiency. You’ll learn how to configure a server setup that not only minimizes your expenses but also reduces energy consumption.
In this home server guide, we will explore various entry-level home server options and highlight the essentials of assembling a DIY server. By the end of this guide, you’ll not only have a fully operational server for home use, but you’ll also gain insights into ongoing maintenance and upgrades to keep your setup future-proof.
For additional tips on technology setups, you might find our article on building a high-performance gaming PC insightful. For more technical information, sites like TechSpot offer comprehensive reviews on various servers and components.
Why Choose a Home Server for Personal Use?
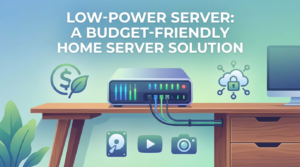
In today’s digital age, setting up a home server can revolutionize your personal and family digital experiences. A home server allows you to centralize data storage, stream multimedia, host a personal website, or even run a private cloud, all while maintaining control over your data. One of the key advantages is cost efficiency, especially when opting for a low-power server setup that not only saves you money up front but also reduces ongoing energy costs.
Choosing an affordable server setup doesn’t mean compromising on functionality. With the right components, you can build a budget-friendly, energy-efficient server that meets your specific needs. This DIY server approach empowers tech enthusiasts to customize their setup to suit entry-level requirements, making it an excellent choice for experimenting and learning.
Moreover, a home server ensures your data privacy, a growing concern among many users. Unlike cloud services where your data resides with third-party companies, a personal server keeps everything within your own network.
For more ideas on cost-effective tech solutions, check out our article on affordable gaming PC builds.
For expert tips on creating an energy-efficient server, you might consider exploring resources like How-To Geek’s home server setup guide for more detailed guidance.
Understanding Home Server Basics
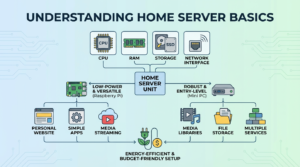
Setting up a low-power server at home can be an affordable and rewarding project. The foundation of building a budget server build is understanding the essential components and how they work together. A home server typically consists of a CPU, RAM, storage, and a network interface, all housed within a power-efficient case. The aim is to create an inexpensive server setup that fulfills your needs while maintaining energy efficiency.
Consider your use-case requirements. Are you looking to host a personal website, manage media libraries, or run simple applications? Depending on your needs, you may opt for a specific configuration, such as a DIY server with higher storage capacity or the capability to run multiple services.
One popular choice for those just starting is the Raspberry Pi due to its low power consumption and versatility. However, for more robust applications, a refurbished mini PC can serve as an entry-level home server. This home server guide helps you navigate these options, ensuring you build a server for home use that doesn’t burden your electricity bill.
Understanding these basics can also assist you in related projects, such as exploring how AI can enhance server security as seen in AI Malware Detection With Python.
For more detailed information on basic server setup principles, consider visiting this guide from TechRadar.
Essential Components for a Home Server
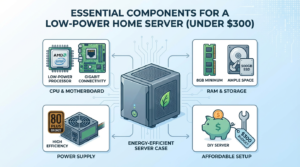
Building an energy-efficient, low-power server for home use can be both rewarding and cost-effective. To achieve a successful DIY server setup, you’ll need to carefully select components that balance performance with energy consumption. Let’s explore the essential components needed for an affordable server setup under $300.
Processor and Motherboard
The processor is the heart of your personal server. Opt for a low-power CPU, such as those from AMD’s Ryzen series or Intel’s i3 range, to keep energy consumption low without sacrificing necessary performance. Pairing your CPU with a compatible motherboard is crucial. A budget server build should focus on motherboards that offer energy efficiency and reliable network connectivity, like those that include built-in Gigabit Ethernet.
For more information on creating budget-friendly builds, you might find our gaming PC build guide helpful as a reference for selecting compatible parts.
RAM and Storage
A minimum of 8GB RAM is recommended for most entry-level home server setups to ensure smooth operation for basic tasks. When it comes to storage, usage typically dictates your needs, but starting with a 1TB HDD or a 500GB SSD can provide ample space for personal data and media libraries. Utilizing energy-efficient components in these areas also contributes significantly to building a low-power server.
Power Supply and Case
Choosing the right power supply unit (PSU) is vital for an energy-efficient server. Look for a PSU with a high-efficiency rating (80 Plus Bronze or better) to minimize energy waste. As for the server casing, a compact and well-ventilated case such as a mini-ITX or micro-ATX can help in maintaining low power consumption and ensuring adequate thermal performance.
For additional insights and external resources on building your inexpensive server setup, you can check out MakeUseOf’s guide on home server essentials.
Choosing the Right Low-Power CPU
When building an energy-efficient server for your home, selecting a low-power CPU is crucial for keeping both energy consumption and costs down. This choice is especially important for those pursuing an affordable server setup under $300. A power-efficient CPU can drastically reduce electricity bills while maintaining reliable performance for your entry-level home server.
When choosing a CPU, consider processors known for their low thermal design power (TDP). TDP refers to the maximum amount of heat a CPU is designed to generate, reflecting its power efficiency. Look for processors with a TDP rating of 65 watts or lower. Popular options include Intel’s Pentium and Celeron lines or AMD’s Athlon series, which are known for balancing performance with low energy use.
- Performance vs. Power: Prioritize balanced models that deliver adequate performance for basic server tasks like file sharing and light data processing.
- Upgrade Path: Choose CPUs that offer compatibility with future upgrades if you anticipate scaling your DIY server later.
For more tips on maximizing your tech stack’s efficiency, visit our internal guide on n8n workflow optimizations.
For additional insights on choosing the right CPU, TechRadar provides a comprehensive guide on finding the best CPU for various needs, including personal servers.
Motherboards: The Heart of Your Home Server
When embarking on the journey to build a low-power server for your home, selecting the right motherboard is paramount. It serves as the heart of your personal server, influencing performance, energy efficiency, and overall capability. As the backbone of your budget server build, a motherboard needs to seamlessly handle tasks while consuming minimal power, making it essential for an energy-efficient server setup.
For an affordable server setup under $300, consider opting for an entry-level home server motherboard that supports the Intel Celeron or AMD Athlon processors. These CPUs offer a balance of performance and energy conservation, perfect for a server designed for home use. Integrated features like onboard graphics and multiple SATA ports also help in reducing costs without sacrificing functionality.
- Ensure compatibility with low-power components to keep electricity consumption in check.
- Look for motherboards with expansion slots for future upgrades, giving your DIY server room to grow.
- Seek out proven brands known for durability and efficiency, like ASUS or Gigabyte.
For those looking to explore more about building efficient systems, our detailed guide on gaming PC builds offers insights into selecting robust components without breaking the bank.
Ultimately, the motherboard you choose will chart the course for your inexpensive server setup. For more detailed insights, resources like Tom’s Hardware provide valuable information on choosing the right parts for your server needs.
Optimal RAM Selection for Server Efficiency
Choosing the right RAM is crucial for optimizing server efficiency, especially when creating a low-power server setup under a tight budget. The focus here is to strike a balance between performance and energy consumption, ensuring that your personal server runs smoothly without breaking the bank. For most DIY server builds intended for home use, 4GB to 8GB of RAM is often sufficient. This range allows you to handle basic tasks, manage data effectively, and ensure energy-efficient operation. However, if your entry-level home server is intended for more substantial workloads, consider upgrading to 16GB.
An investment in quality RAM from reputable brands not only enhances server performance but also contributes to an affordable server setup long-term. While searching for budget-friendly options, ensure that the RAM is compatible with your motherboard to avoid unexpected costs. Performance may vary slightly between different brands, but choosing RAM from established companies will save future headaches.
For more insights on optimizing your tech setup, discover our Comprehensive N8N Automation Guide 2025. Additionally, you can learn more from a reputable source like Crucial’s guide on memory types which provides a deeper understanding of the various RAM options and their uses.
Cost-Effective Storage Options for Home Servers
When building an affordable server setup, selecting the right storage options is crucial for maintaining a budget-friendly and energy-efficient server while ensuring optimal performance. This section of our home server guide focuses on identifying inexpensive storage solutions that can be integrated into your DIY server without overshooting the $300 limit.
For personal servers geared toward light to moderate use, SATA HDDs and SSDs are ideal. Traditional hard drives offer substantial capacity at lower costs, making them perfect for storing media or backups. However, if speed and energy efficiency are priorities, investing in a smaller SSD can significantly enhance read/write times and reduce power consumption.
Consider a blend of both HDDs and SSDs for a balanced budget server build. Pairing a moderate-sized SSD as a boot drive with a larger HDD for data can provide optimal performance at a reasonable cost.
For those keen on minimizing expenses, consider browsing trusted platforms like Newegg and Amazon for discounts on refurbished or older model drives. For future-proofing your setup, explore eSATA or USB 3.0 enclosures that facilitate easy upgrades.
For further insights on optimizing your tech setup, explore our guide on how to use hardware transcoding in Plex to enhance media server capabilities while conserving energy.
Power Supply Considerations for a Budget Server
When embarking on a personal server project, the importance of selecting the right power supply cannot be overstated. For a budget server build geared towards home use, the power supply is a pivotal component that influences both efficiency and performance. An energy-efficient server demands a power supply unit (PSU) that not only meets the power requirements of all components but also operates with minimal energy waste.
The first consideration is the total wattage. A low-power server setup typically requires a PSU in the range of 200 to 400 watts, depending on the hardware involved. Overpowering your personal server is both unnecessary and inefficient. Choosing a PSU with an 80 PLUS Certification ensures that the unit will provide at least an 80% energy efficiency, which is crucial for an affordable server setup.
It’s compelling to explore modular PSUs as they allow for better cable management, preventing unwanted clutter and potentially improving airflow within the server case. Efficient cable management contributes significantly to sustaining an inexpensive server setup by enhancing cooling, which can be a cost-saver in terms of energy consumption.
For further optimization in your DIY server journey, consider diving into our resources such as ways to boost efficiency in your tech stack. Additionally, resources like Tom’s Hardware PSU reviews are invaluable for making an informed choice.
Setting Up Your Home Server: A Step-by-Step Guide
Embarking on creating your own low-power home server is a rewarding endeavor, providing you with a personal server without breaking the bank. With an affordable server setup, you can efficiently manage your own data storage and applications. This guide walks you through setting up a server for home use, ensuring your system not only fits your needs but remains energy-efficient and under $300.
Step 1: Gather Your Components
To kickstart your DIY server journey, you’ll need essential components that strike a balance between performance and cost. These include:
- A low-power, budget-friendly processor
- A compatible motherboard with sufficient RAM slots
- 4GB or more of RAM
- Low-power hard drives or SSDs
- A compact, energy-efficient case, like a mini-ITX
- A power supply unit that complements the build’s energy requirements
By procuring the right components, you can ensure your server operates efficiently and remains inexpensive. Consider visiting this guide on building a gaming PC for component ideas, akin to those used in a budget server build.
Step 2: Install Your Operating System
Once you’ve assembled your hardware, it’s time to select an operating system that aligns with your personal server needs. Popular choices include Linux distributions, such as Ubuntu Server, known for their resource-efficient performance. Ensure your system is adequately prepped for internet connectivity and energy-efficient operation.
Step 3: Secure and Optimize
Security is paramount when dealing with a server, even an entry-level home server. Make sure to:
- Configure a strong firewall
- Regularly update your system to patch security vulnerabilities
- Use strong, unique passwords
For further security tips, consider reading this external guide on home server security. It provides comprehensive insight into protecting your setup.
With these steps meticulously executed, you are well on your way to managing a functional and secure home server. Whether you’re using it for personal media streaming or hosting applications, this setup will serve as a robust foundation at a cost-effective budget.
Operating System Options for Home Servers
Choosing the right operating system (OS) is a critical step in building your home server. Whether you’re focusing on an energy-efficient server or a budget server build, the OS you select will influence performance, user-friendliness, and functionality. In this section of our ultimate home server guide, we’ll explore various options tailored for a low-power server setup.
Windows Server
If you’re familiar with Windows and need easy integration with your existing home environment, Windows Server is a solid choice. It offers a user-friendly interface and is ideal for those who require seamless connectivity with other Windows devices. However, keep in mind that it’s not the most budget-friendly option for a personal server.
Linux Distributions
Linux-based systems like Ubuntu Server, CentOS, and Debian are open-source and highly customizable, making them popular in inexpensive server setups. With a focus on performance and community support, these are excellent for a DIY server approach, providing flexibility with low resource demands. Plus, they’re generally free, enhancing their appeal for an entry-level home server.
FreeNAS
For those prioritizing data storage, FreeNAS is an exceptional choice. This free OS is optimized for creating a Network Attached Storage (NAS) system, superb for managing large files across various devices. FreeNAS is a proven fit for building an energy-efficient server while maintaining data safety and redundancy.
While these are some foundational choices, it’s crucial to weigh the benefits against your specific needs and technical know-how. If you’re interested in larger tech projects, consider exploring our article on building a local AI agent with Python for more DIY tech insights. For further guidance on choosing an OS, here’s a helpful resource from How-To Geek to expand your understanding of setting up a home server.
Configuring Your Home Server for Optimal Performance
Achieving peak performance in a low-power server involves a few strategic configurations that maximize efficiency while keeping energy consumption low. In this section of our ultimate home server guide, we’ll explore steps to optimize your server for home use without exceeding your budget server build constraints.
- Operating System: Consider using a lightweight Linux distribution such as Ubuntu Server or Debian. These are popular choices due to their low resource requirements and robustness, which make them ideal for an energy-efficient server.
- Storage Configuration: Opt for SSDs over traditional HDDs to accelerate data access speeds and improve power efficiency. Although a bit pricier, SSDs dramatically reduce the power draw of your home server setup.
- Virtualization: Utilize virtualization tools like Proxmox or VMware’s ESXi to manage multiple workloads efficiently. Virtualization can help you achieve an inexpensive server setup by running several services on a single machine.
- Cooling and Monitoring: Keep your server temperatures in check with adequate cooling solutions. Regular monitoring of system metrics will help prevent overheating and maintain long-term performance.
For further enhancement in tech setups, you can explore our comprehensive n8n automation guide. Additionally, for more insights into home server configurations, Tom’s Hardware offers an extensive guide on budget-friendly personal servers.
Enhancing Security on Your Home Server
When setting up your new budget server build, it is crucial to prioritize security. A low-power server for home use may not house sensitive corporate data, but it can still be a target for malicious attacks. Start by securing your personal server with strong firewall protections to shield against external threats. Additionally, using regularly updated antivirus and anti-malware software will enhance your server’s defenses.
When configuring your home server, ensure that all default passwords are changed to unique, robust alternatives. Implementing multi-factor authentication will add an extra layer of protection. Keep your server operating system and any installed software up-to-date to protect against vulnerabilities.
- Utilize encryption for data transmission.
- Regularly back up your data.
- Monitor server logs for any unusual activities.
For more on maintaining your server’s security, check out our detailed guide on securing your online identity. Additionally, consider exploring free security tools offered by CISA to enhance your server’s defense mechanisms. Adopting these practises will help ensure that your inexpensive server setup remains safe and efficient, allowing you to enjoy the full benefits of your energy-efficient home server.
Monitoring and Maintaining Your Home Server
Once you have your home server up and running, consistent monitoring and maintenance are crucial to ensure its efficient operation. As part of this ultimate home server guide, it’s important to note that a low-power server often requires a minimal yet effective management strategy. Regular check-ups will not only keep your energy-efficient server performing well but also prolong its lifespan.
Start by setting up automated notifications or alerts that inform you of any unusual activities or potential issues. This can involve unusual spikes in resource usage, network connectivity problems, or application errors. Consider using open-source tools like Nagios or Zabbix, designed specifically for personal server monitoring.
Additionally, stay on top of software updates and security patches to ensure your DIY server remains secure from vulnerabilities. Regularly back up your server data to prevent data loss, following a structured schedule. An entry-level home server can benefit significantly from such proactive measures, particularly when built as a budget server build.
For more insights on tackling technical challenges in server maintenance, make sure to read our post on troubleshooting WiFi issues. Furthermore, check out guides from authoritative sources like TechRepublic for deeper insights into maintaining an inexpensive server setup.
Real-World Examples of Home Server Setups Under $300
The Raspberry Pi Solution
A true hero in the realm of budget server builds, the Raspberry Pi 4 is an excellent choice for a low-power server setup. Armed with a quad-core CPU, 4GB RAM, and a robust community for support, it’s ideal for anyone venturing into DIY server projects. Most notably, this setup is cost-effective, typically under $100, leaving room in your budget for storage solutions. Whether you’re hosting personal files or a small website, the Raspberry Pi can handle multi-tasking with ease, making it a versatile part of this home server guide.
Moreover, its energy-efficient server capabilities are perfect for 24/7 uptime without spiking your electricity bill. For those interested in alternative use cases, the Raspberry Pi acts as a formidable platform for thousands of other tech projects, as discussed in our local AI agent guide. For more on why Raspberry Pi is ideal, check out this resource on Raspberry Pi’s official website.
The Odroid HC4 NAS Setup
A step up in processing power and storage capacity, the Odroid HC4 is another great option for an affordable server setup. Priced around $120, it features dual SATA ports for up to 32TB of storage, making it optimal for creating your personal server. Include a couple of WD Red NAS hard drives and you’ll have a potent energy-efficient server. Unlike traditional server farms, this combination runs on minimal power while supporting media streaming and large file storage.
This inexpensive server setup is designed not just for tech enthusiasts but also for individuals needing reliable storage without recurring cloud fees. It’s a noteworthy contender in our home server guide due to its balance of cost, performance, and power efficiency. Consider expanding your server facilities by exploring high FPS gaming setups found in our best $1000 gaming PC build.
The HP EliteDesk 800 G1 Mini
For those who prefer pre-built solutions, the HP EliteDesk 800 G1 Mini is a viable entry-level home server. These refurbished units boast Intel i5 processors and come with either 4GB or 8GB of RAM, available for as little as $200. Ideal for users seeking a straightforward setup, this energy-efficient server supports remote desktop access and simple file hosting straight out of the box.
The compact size makes it easy to place anywhere at home, while its solid performance underpins media server capabilities for streaming. Users benefit from having a low-power server operation, which minimizes energy costs. As an added advantage, consider ensuring your network remains secure by reading our dark web password check guide.
Conclusion: Achieving a Powerful, Energy-Efficient Home Server
Building a powerful, energy-efficient home server on a budget is not only achievable but also an enriching endeavor for any tech enthusiast. This guide has walked you through the essentials of assembling a low-power server setup for under $300, focusing on components that offer both performance and energy efficiency. By strategically selecting each part, you can create a DIY server that serves personal needs such as media storage, website hosting, or running a private cloud. This budget server build ensures you can maintain the balance between cost, functionality, and environmental impact.
In addition to the foundational steps mentioned here, exploring other resources such as detailed hardware comparisons can be extremely beneficial. Websites like Tom’s Hardware offer valuable insights into current hardware and server trends. Moreover, for those interested in further optimizing their tech stacks, you might find our article on how to boost efficiency in your tech stack particularly enlightening.
In conclusion, creating an inexpensive server setup for home use not only saves money but also empowers you with a personal server that reflects your specific needs. As technology progresses, staying informed and adaptable will enable you to continue making the most of your entry-level home server.